TL;DR
I used unbound to set up a local DNS server then pointed my wireless router at it. This made it easy to test changes from my development machine right on the device on the my local wifi network without a noticeable affect on standard browsing performance.
Motivation
The web application I’ve been working on (Lynr, a cloud based inventory management tool for car dealerships) is targeted primarily for mobile use cases. In this case mobile translates (mostly) to small viewport and moving but not necessarily distracted. To facilitate rapid development, all my local testing had thus far been done in Google Chrome with a narrow (640 pixels wide) viewport. This was fine for a while but inevitably there were rendering differences between desktop Chrome, Mobile Safari, Android Browser and Android Chrome. The nearer to launch we got (and now post-launch) the more important these small differences became. I needed a way to test local application changes without first pushing them to a staging server1.
Assumptions
I’m running OS X 10.9 (Mavericks) and have access to the admininstration panel of my wireless router. Unbound should work with any Linux based OS and the DNS changes can be done per device (at least for iOS) rather than on the router but making the DNS change on the router makes it one change for all devices and one change to revert when you’re done testing2 as opposed to having to manage settings on multiple devices3. Linux software packages are installed via Homebrew.
Setup
The first thing to do is install Unbound which is the crux of this the whole solution.
$ brew install unbound

==> Downloading https://downloads.sf.net/project/machomebrew/Bottles/unbound-1.4.22.mavericks.bottle.tar.gz
######################################################################## 100.0%
==> Pouring unbound-1.4.22.mavericks.bottle.tar.gz
==> Caveats
To have launchd start unbound at startup:
	sudo cp -fv /usr/local/opt/unbound/*.plist /Library/LaunchDaemons
Then to load unbound now:
    sudo launchctl load /Library/LaunchDaemons/homebrew.mxcl.unbound.plist
==> Summary
🍺  /usr/local/Cellar/unbound/1.4.22: 52 files, 3.4M
I don’t like software always running in the background if it isn’t necessary so I did not run the launchctl command. Instead I am starting unbound when I want it running using dtach4. You could alternatively use screen, tmux, launchctl or even an open and ignored terminal window; whatever you are most comfortable with.
The next thing to do is configure unbound. The configuration file, when installed via homebrew, is located at /usr/local/Cellar/unbound/1.4.22/etc/unbound/unbound.conf. My full unbound.conf is not embedded because I modified the default file and, including comments, it is 650 lines. The important bits are included below and in this abbreviated unbound.conf file.
# The server clause sets the main parameters.
server:
  # Allow network connections outside
  # of localhost
  interface: 0.0.0.0
  # Don't automatically run in the background
  # because I want to be able to kill it without
  # hunting a pid
  do-daemonize: no
  # TODO: Change this to your network range,
  # like `192.168.0.0/16 allow`
  access-control: 10.0.0.0/16 allow
  # TODO: Change this to your username, or
  # whatever user you want to run/own the
  # `unbound` process
  username: "bryanjswift"
  # TODO: The DNS records for your local site
  local-zone: "lynr.co.bimac." static
  local-data: "lynr.co.bimac. 10800 IN NS localhost."
  local-data: "lynr.co.bimac. 10800 IN SOA localhost. nobody.invalid. 1 3600 1200 604800 10800"
  local-data: "lynr.co.bimac. 10800 IN A 10.0.1.7"
# Forward zones
forward-zone:
  # This forwards all DNS requests not found in
  # `local-zone` data to another DNS provider
  name: "."
  # NOTE: if you don't want to use Google Public
  # DNS changes these IP addresses
  forward-addr: 8.8.8.8
  forward-addr: 8.8.4.4
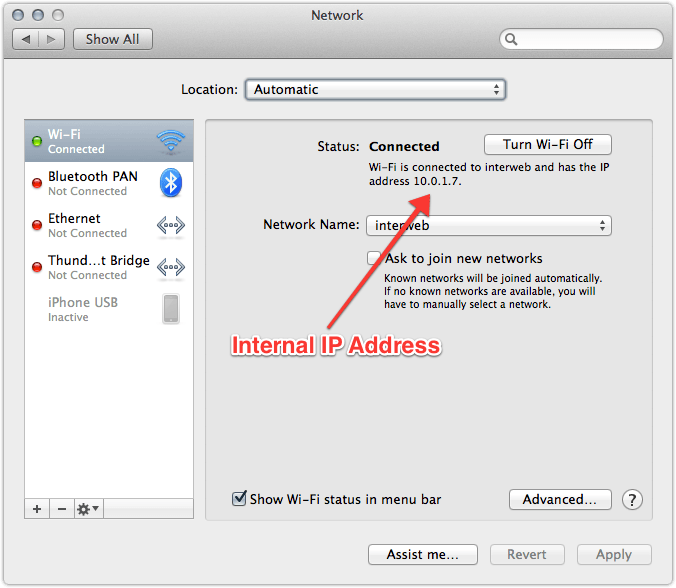
The things to make sure you change are access-control:, username: and the local-zone:. Search for these properties in /usr/local/Cellar/unbound/1.4.22/etc/unbound/unbound.conf and change them. username: is the easiest to change, it should be whatever your username is when you are logged in. If you don’t know this you can find out by executing the whoami command in a Terminal window. Regarding local-zone:, during development I run local applications with names like production.domain.com.local because it makes both what I’m working on and where it is hosted obvious at a glance. The domain name (lynr.co.bimac from my abbreviated configuration file) in unbound.conf can be changed to whatever convention you’ve adopted for yourself. access-control: is an IP mask for your router’s internal IP addresses. Internal IPs typically start with 192.168. or 10.0.. To find out which your router uses open the Network panel in System Preferences and look for the text ‘and has the IP address’ under ‘Status: Connected’ when looking at the Wi-Fi panel. The first two numbers (dots included) should replace the 10.0. on line 8 of abbreviated unbound.conf. The whole IP address should replace 10.0.1.7 on line 15.
Unbound should now be appropriately configured to direct requests for your web application to the machine where your local development server is running. All you have to do is start it. Starting unbound will require sudo or superuser/admin privileges5. I start unbound via dtach by executing dtach -c unbound.sock sudo /usr/local/opt/unbound/sbin/unbound -c /usr/local/Cellar/unbound/1.4.22/etc/unbound/unbound.conf, if you are using screen, tmux or something else you only need sudo /usr/local/opt/unbound/sbin/unbound -c /usr/local/Cellar/unbound/1.4.22/etc/unbound/unbound.conf.
On the topic of your development server, make sure it is binding to 0.0.0.0 or your internal IP address (e.g. 10.0.1.7) and not 127.0.0.1 (localhost). If your development server is bound to localhost it will not be able to accept connections that do not originate from your local machine. Lynr is built on a Ruby/Rack stack and by default the rackup command binds to 0.0.0.0. However, if you’re changing Ruby files you’re likely to be using something like shotgun which binds to 127.0.0.1 by default. shotgun accepts a -o option to change host, so shotgun -o 0.0.0.0 will change the host to which the ruby process binds. If you’re developing with Node.js the server.listen does the right thing (binding to 0.0.0.0) by default.
The last thing to do on your development machine is to make sure the OS firewall is either disabled or allowing connections by the unbound process and whatever process is running your site (ruby in my case). Firewall settings are found in System Preferences in the Security & Privacy panel on the Firewall tab. When the firewall is on the panel says ‘Firewall: On’ with a green dot.
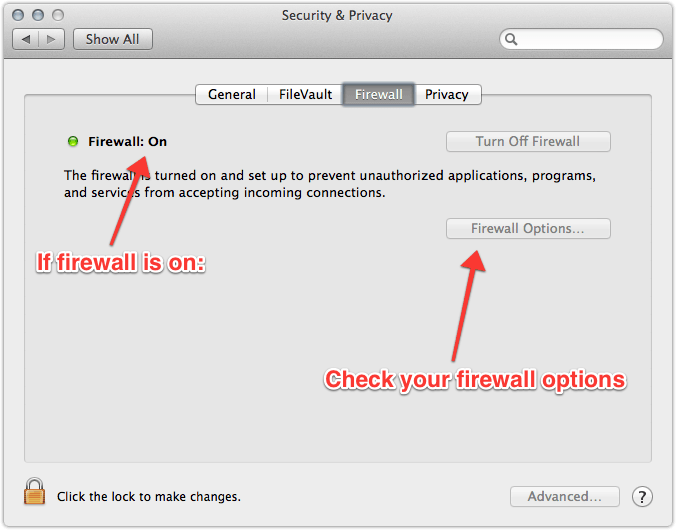
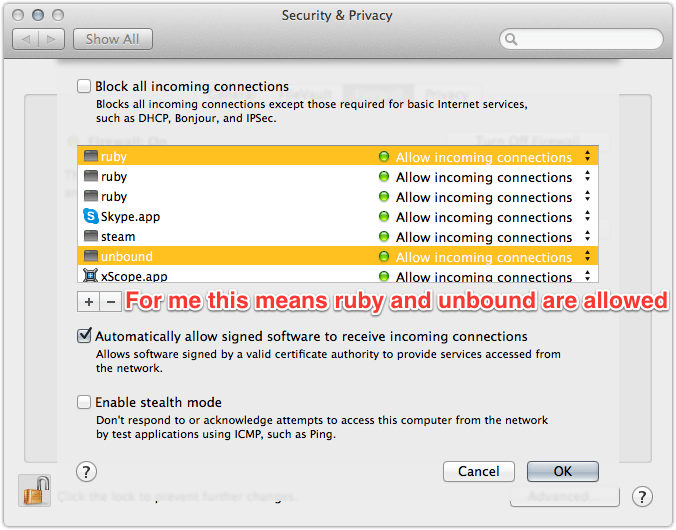
If the firewall is on go into Firewall Options… and make sure the unbound and your server process have green dots saying ‘Allow incoming connections’.
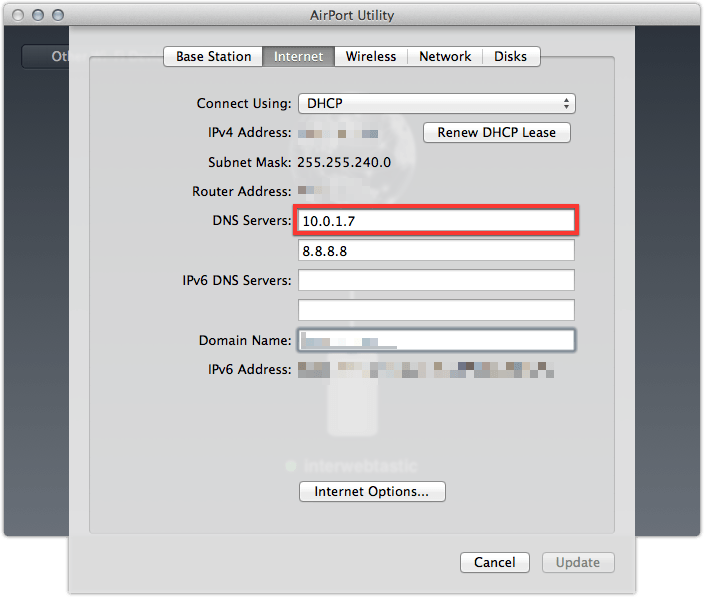
Your development machine is now ready to respond to DNS requests and serve your application to devices on the network. The last thing we have to do is tell the devices to use your shiny new, local DNS server. I did this by changing my router settings to use my development machine for DNS queries first and Google Public DNS second. I have an Apple Airport Extreme so I was able to do this with the Airport Utility application. If you change the DNS settings on the router they will propogate to all devices connected to the network6 via that router.
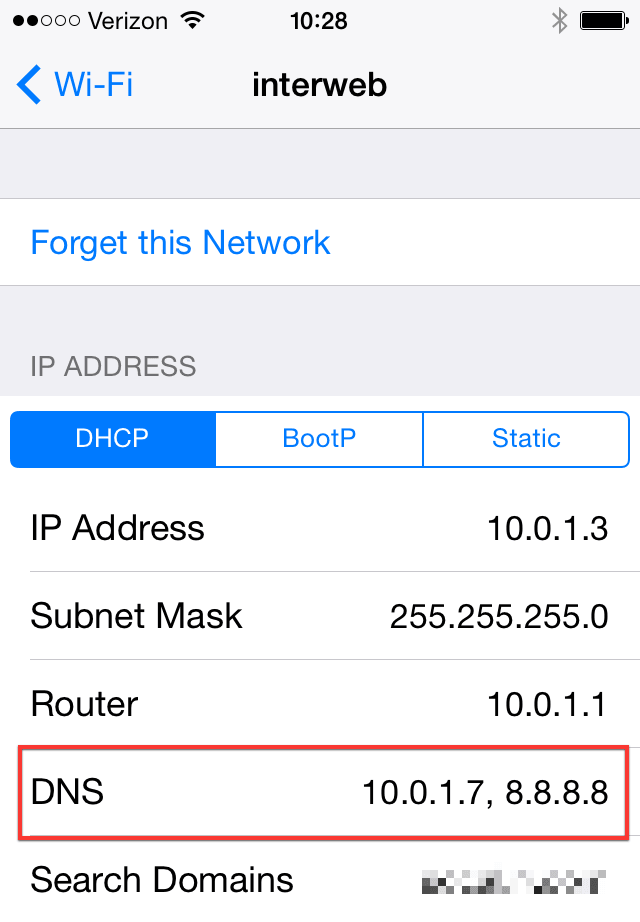
The DNS server settings can also be changed one a device-by-device basis. On iOS 7, for example, go into Settings > Wi-Fi and tap the blue information circle next to your wireless connection. About two thirds of the way down the screen is a field which says DNS where you can add the internal IP address of your development machine.
If anyone knows how to change this on an individual Android device I’d appreciate it if you let me know.
I’ve been running this setup for a couple of days and I haven’t noticed any degraded network performance, even when my development machine is asleep and not able to serve DNS requests. This has been a huge win for me, vastly improving my workflow and front-end testing on devices.
-
Lynr is hosted on Heroku and I didn’t want to create a commit and push to staging to test every change. I did this for a couple of changes and it was a pain in the ass. ↩
-
for the day, because you’re never done testing. ↩
-
Assuming you’re testing on multiple devices. You are testing on multiple devices right? ↩
-
dtachhasn’t been updated in years but it continues to run just fine. ↩ -
unboundbinds to port 53 which requires root access. ↩ -
Provided those devices are getting IP addresses from DHCP. ↩